
Recommended server parameters
We recommend installing on 4C 4G 20G SSD ()
Features
There are several file opening modes:
Editing — single-user mode, current changes are visible only to the person who opened it. You can open one document in multiple tabs.
When you click Save — the file is updated in Totum.
If someone else had this file open in parallel, they will see a message that the connection to the file is lost and they will not be able to save their version directly to the server — only save locally and then overwrite the file field.
If you click Save and close, the file will be saved and all windows with this file open for the user will be closed.
Shared editing — multiple people can edit one file simultaneously.
When you click Save, the file is updated in Totum. You can save at any time, and all changes are synchronized for everyone who opened it in shared mode.
If someone had this file open in Editing mode, they will see a message that the connection to the file is lost and they will not be able to save their version directly to the server — only save locally and then overwrite the file field.
View — view only.
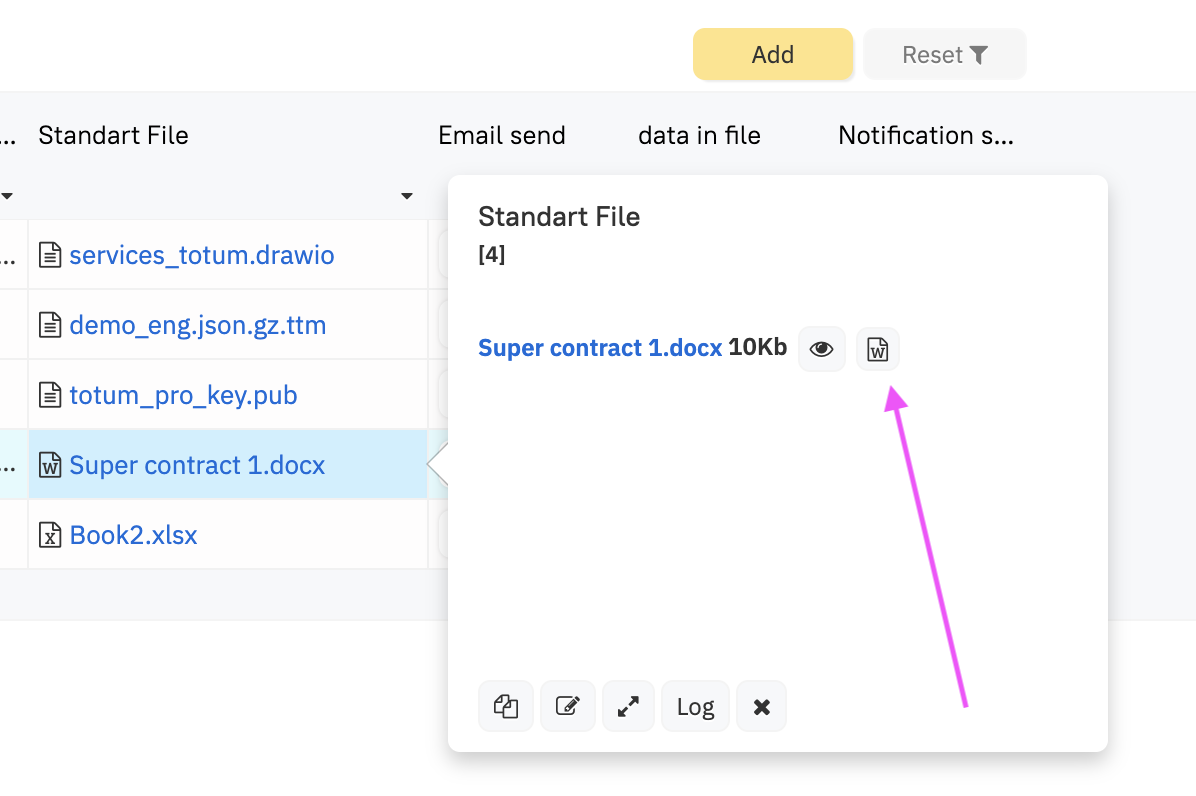
If you open the field for editing and click on the OF icon — this is Editing mode!
after saving in OF, you need to save the field again.
everyone who was editing this file in parallel will be kicked out with an error Connection to the file is lost!
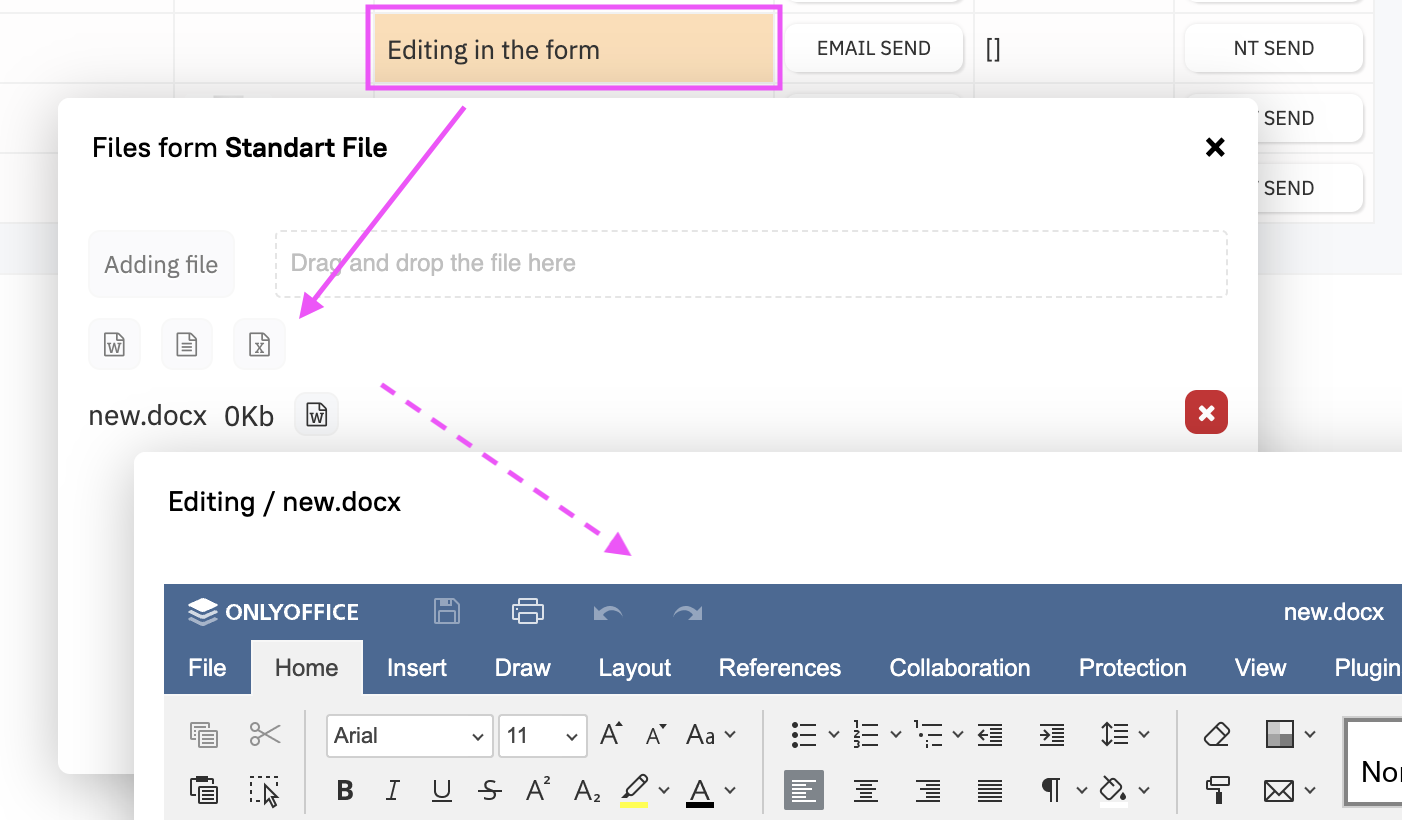
Creating a new file directly from the File field
After saving in OF, you need to save the field again!
If the file field has Versions enabled
When calling OO from the context panel by right-clicking — the latest version opens.
If this version belongs to the user opening it — if there is a rewrite timer, you will be prompted to create a new version or overwrite.
If it is someone else's version, a new version will be created.
The file can be opened in Shared mode, but saving with overwrite will only be available to the version owner!
Installing and connecting Only Office Document Server
Installation
Register the server and address the domain.
Attention: this instruction is written for installation on a separate server from the main Totum server! Executing it on the Totum server will make the installed Totum inoperable!
Links to OO documentation:
docs-community-install-ubuntu ⟹
Update apt:
apt update
Install ufw and allow 22, 80, and 443 ports:
apt install ufw && ufw default deny incoming && ufw default allow outgoing && ufw allow 22/tcp && ufw allow 80/tcp && ufw allow 443/tcp
Install postgreSQL:
apt -y install postgresql
Launch the DB console (come up with a password instead of typepasshere and write it down, it will be needed later):
sudo -u postgres psql
CREATE USER onlyoffice WITH ENCRYPTED PASSWORD 'typepasshere';
CREATE DATABASE onlyoffice;
GRANT ALL PRIVILEGES ON DATABASE onlyoffice TO onlyoffice;
\q
Install nginx:
apt -y install nginx nginx-extras
Install rabbitmq-server:
apt -y install rabbitmq-server
Add the GPG key:
mkdir -p -m 700 ~/.gnupg
curl -fsSL https://download.onlyoffice.com/GPG-KEY-ONLYOFFICE | gpg --no-default-keyring --keyring gnupg-ring:/tmp/onlyoffice.gpg --import
chmod 644 /tmp/onlyoffice.gpg
sudo chown root:root /tmp/onlyoffice.gpg
sudo mv /tmp/onlyoffice.gpg /usr/share/keyrings/onlyoffice.gpg
Add the ONLYOFFICE Docs repository:
echo "deb [signed-by=/usr/share/keyrings/onlyoffice.gpg] https://download.onlyoffice.com/repo/debian squeeze main" | sudo tee /etc/apt/sources.list.d/onlyoffice.list
Update apt:
apt update
Install mscorefonts:
apt -y install ttf-mscorefonts-installer
You need to answer yes twice.
Install ONLYOFFICE Docs:
apt -y install onlyoffice-documentserver
Here you must enter the password for the DB (when inserting, it is not displayed in the window)
Enable https. You need to replace EMAIL and HOST (the host is specified without the protocol):
apt -y install certbot
bash /usr/bin/documentserver-letsencrypt.sh EMAIL HOST
Next, you can open the path https://HOST — the OODS welcome page should be displayed.
Get the authorization token:
documentserver-jwt-status.sh
Your JWT settings:
JWT enabled -  true
JWT secret  -  lSOMbvHpIRJQidvEKl8PzAhq141XxTdg
JWT header  -  Authorization
You need the JWT secret
Or you can find it in the configuration. See the example below — find it in place of HERE_WILL_BE_YOUR_TOKEN:
nano /etc/onlyoffice/documentserver/local.json
{
  "services": {
    "CoAuthoring": {
      "sql": {
        "type": "postgres",
        "dbHost": "localhost",
        "dbPort": "5432",
        "dbName": "onlyoffice",
        "dbUser": "onlyoffice",
        "dbPass": "HERE_WILL_BE_YOUR_DB_PASS"
      },
      "token": {
        "enable": {
          "request": {
            "inbox": true,
            "outbox": true
          },
          "browser": true
        },
        "inbox": {
          "header": "Authorization"
        },
        "outbox": {
          "header": "Authorization"
        }
      },
      "secret": {
        "inbox": {
          "string": "HERE_WILL_BE_YOUR_TOKEN"
        },
        "outbox": {
          "string": "HERE_WILL_BE_YOUR_TOKEN"
        },
        "session": {
          "string": "HERE_WILL_BE_YOUR_TOKEN"
        }
      }
    }
  },
  "rabbitmq": {
    "url": "amqp://guest:guest@localhost"
  },
  "storage": {
    "fs": {
      "secretString": "HERE_SOME_KEY_FROM_RABBIT_MQ"
    }
  }
}
Connection
In Totum in the settings table — h_pro_only_office you need to specify an array of this type:
{
  "ip": "API_OO_SERVER",
  "host": "https://o-office.your-host.com",
  "token": "WlwedfI4hsy3Sd6eEFKgrds5du7VsLN"
}
ip — optional parameter. If specified, Totum will check the ip for incoming requests coming to the incoming connector. Specifying reduces the likelihood of an attack on it. If not specified, it must be completely removed.
host — the host of the OO server along with the protocol.
token — the token obtained during the installation step.
Update
Stop the server:
documentserver-prepare4shutdown.sh
Download the update script:
wget http://download.onlyoffice.com/docs/docs-install.sh
Run:
bash docs-install.sh -u true