Printing and CSV
Printing
Print Call
Printing is based on HTML-CSS templates, which are taken from the print templates table. Standard printing calls the main template, passing the values selected by the user in the {table}.
Additionally, the browser print window can be called by the action function linkToPrint.
When calling the linkToPrint function, the template is specified in the template: parameter, and the data in the data: parameter.
The values for template: and data: can be:
For simple variable replacement
{}in the template:- In
template:— the template name as specified innamein print templates. - In
data:— an associative array with keys corresponding to the variables in the template and values for substitution.
example1: linkToPrint(template: "name"; data: $row1) row1: rowCreate(field: "var1" = "value1"; field: "var2" = "value2")- If a variable in the template is defined with a key like
{test2["key"]}, then in this case, you need to pass an associative array to the variable from which the key will be selected in the template.
- In
To use an additional nested template instead of simple variable replacement when calling the template, you need to pass an associative array of a specific type as the value of this variable in
data::
{
  "template": "template_name",
  "data": {
    "key": "value"
  }
}
example2: linkToPrint(template: "name"; data: $row2)
row2: rowCreate(field: "var1" = $row22; field: "var2" = "value2")
row22: rowCreate(field: "template" = "inner_template"; field: "data" = $row222)
row222: rowCreate(field: "i_var1" = "i_value1"; field: "i_var2" = "i_value2")
- To use a nested template with repeating elements (e.g., rows) in
data:, a reference to the nested template is passed. In thedataof the nested template, a list of associative arrays is passed:
{
  "data": [
    {
      "key1": "value"
    },
    {
      "key1": "value2"
    }
  ],
  "template": "template_name"
}
example3: linkToPrint(template: "name"; data: $row3)
row3: rowCreate(field: "var1" = $row33)
row33: rowCreate(field: "template" = "inner_multi_template"; field: "data" = $row333)
row333: rowListCreate(field: "i_var1" = $listvalue1; field: "i_var2" = $listvalue2)
listvalue1: listcreate(item: "value1_row1"; item: "value1_row2")
listvalue2: listcreate(item: "value2_row1"; item: "value2_row2")
Template Formatting
Variables in the template can be specified as follows:
{test1} — simple replacement with a value or a nested template.
{test2["key"]} — a variable with a key, implying that an associative array containing key values will be passed to it.
{test3,date:d.m.Y} — passing a variable with formatting. Formatting can be assigned to both a simple variable and a variable with a key. Possible formatting:
- money
- number
- date
- checkbox
Value Formatting in Template
money
Used to display a numeric value as text in words. Note — the absence of a space after the comma is significant.
<div>{num,money}</div>
{"num":10000.10}
Result:
<div>ten thousand rubles 10 kopeek</div>
number
Used for numeric values to display a formatted number.
After the colon in number, parameters are entered separated by | in a specific sequence:
Number of decimal places.
Decimal separator.
Thousands separator.
Units of measurement — if null or empty string is passed, units of measurement are not displayed.
<div>{num,number:0|,| | R.}</div>
{"num":10000.10}
Result:
<div>10 000 R.</div>
date
Used for date/time, displays formatted date/time.
After the colon, the date format is specified just like for the dateFormat function.
If the format uses:
F — the name of the month is displayed in Russian.
f — the name of the month is displayed in Russian in the genitive case.
checkbox
Used for true/false values, one of the proposed designations is displayed depending on the input value.
By default, true/false values are printed as 1 and "".
<div>{bool,checkbox:✓|-}</div>
{"num":true}
Result:
<div>✓</div>
Example
example: linkToPrint(template: "main"; data: $#data)
Composition of used templates:
main
<div style="position: absolute; right: 0px; top: 0px;">
  <img src="/fls/297_main_img.png" style="width: 40px;"/>
</div>
{table}
production_items
<div class="breakit">
  <div class="title">
    {title}
  </div>
  <div class="context">
      <div class="image" style="background-image: url('{image}')"></div>
      <div class="params">
        <table>
        {params}
        </table>
     </div>
  </div>
  <div class="parts">
          {parts}
        </div>
</div>
production_items_params
<tr>
  <td>{param_name}</td>
  <td>{param_value}</td>
</tr>
production_parts
<div>
    <div>{name}</div>
    <div>{count}</div>
</div>
Contents of the variable $#data:
{
  "table": {
    "template": "production_items",
    "data": {
      "image": "/fls/test.png",
      "params": {
        "template": "production_items_params",
        "data": [
          {
            "param_name": "Dealer/Counterparty",
            "param_value": "Massage Paradise"
          },
          {
            "param_name": "Order Number Sport",
            "param_value": 1
          },
          {
            "param_name": "Production Type",
            "param_value": "Large Assembly"
          },
          {
            "param_name": "Order Delivery Date",
            "param_value": "28.06.2019"
          },
          {
            "param_name": "Quantity",
            "param_value": "1"
          },
          {
            "param_name": "Number of Seats",
            "param_value": null
          },
          {
            "param_name": "Color/Leather",
            "param_value": "Light Beige 1132"
          },
          {
            "param_name": "Description",
            "param_value": ""
          },
          {
            "param_name": "Standard Modification",
            "param_value": ""
          }
        ]
      },
      "parts": {
        "template": "production_parts",
        "data": [
          {
            "name": "Nut M8",
            "count": 8
          },
          {
            "name": "Bolt M8x60",
            "count": 8
          },
          {
            "name": "Clamp",
            "count": 4
          },
          {
            "name": "Handrail M",
            "count": 1
          },
          {
            "name": "Stand 3300 mm",
            "count": 4
          }
        ]
      },
      "title": "Couch with Electric Drive EH6"
    }
  }
}
Result:
<div style="position: absolute; right: 0px; top: 0px;">
    <img src="/fls/297_main_img.png" style="width: 40px;">
</div>
<div class="breakit">
    <div class="title">
        Couch with Electric Drive EH6
    </div>
    <div class="context">
        <div class="image" style="background-image: url('/fls/')"></div>
        <div class="params">
            <table>
                <tbody>
                <tr>
                    <td>Dealer/Counterparty</td>
                    <td>Massage Paradise</td>
                </tr>
                <tr>
                    <td>Order Number Sport</td>
                    <td>1</td>
                </tr>
                <tr>
                    <td>Production Type</td>
                    <td>Large Assembly</td>
                </tr>
                <tr>
                    <td>Order Delivery Date</td>
                    <td>28.06.2019</td>
                </tr>
                <tr>
                    <td>Quantity</td>
                    <td>1</td>
                </tr>
                <tr>
                    <td>Number of Seats</td>
                    <td></td>
                </tr>
                <tr>
                    <td>Color/Leather</td>
                    <td>Light Beige 1132</td>
                </tr>
                <tr>
                    <td>Description</td>
                    <td></td>
                </tr>
                <tr>
                    <td>Standard Modification</td>
                    <td></td>
                </tr>
                </tbody>
            </table>
        </div>
    </div>
    <div class="parts">
        <div>
            <div>Nut M8</div>
            <div>8</div>
        </div>
        <div>
            <div>Bolt M8x60</div>
            <div>8</div>
        </div>
        <div>
            <div>Clamp</div>
            <div>4</div>
        </div>
        <div>
            <div>Handrail M</div>
            <div>1</div>
        </div>
        <div>
            <div>Stand 3300 mm</div>
            <div>4</div>
        </div>
    </div>
</div>
Full CSV
General CSV Information
Each table can be exported and imported via CSV. To make this possible, you need to enable access for roles in the table settings.
Roles with CSV access – roles that can export the table to CSV according to their field visibility rights and prefilter restrictions.
Only those rows and in the order that the user sees in the web interface are exported — js-filters are also applied.
The columns that are available to the user in the web interface are exported, taking into account their display.
Therefore, do not export under one role and import under another — as the import role may lack access rights and not all data will be updated!
Roles with CSV editing — roles that can change values in the table. This role has almost full capability to change values in the table:
Blocking rules based on formatting conditions do not apply when uploading CSV!
It is possible to change the values of those fields for which there is edit permission and add permission in case of adding rows.
The export file contains an encrypted hash of the prefilter by which the possibility of changing rows will be determined.
If there is a prefilter in the table to which the upload is being made, the presence of the prefilter hash in the upload file is mandatory!
CSV is created in
UTF-8with semicolon delimiters;.In Excel and similar programs, the export to CSV is labeled as "CSV comma delimiter," but in most cases, it is actually a semicolon. The first time you need to check by opening the resulting file in "Text edit."
If your system creates a CSV comma delimiter, this can be overridden in Excel:
File > Options > Advanced settings.

Uncheck 'Use system settings'.

Set 'Decimal separator' to (comma), and 'Thousands separator' to space.

Click OK.
The upload file is processed in both
UTF-8andWIN-1251encodings. The encoding is determined automatically during upload.To delete a row, you need to place any character in the
Deletecolumn.To add a row, you need to leave the
idcolumn empty.
We do not upload data for the Comments and Button fields. The Text and Data fields are exported/imported in base64. The File field is not exported at all — if it is in the table, it needs to be hidden.
File Format
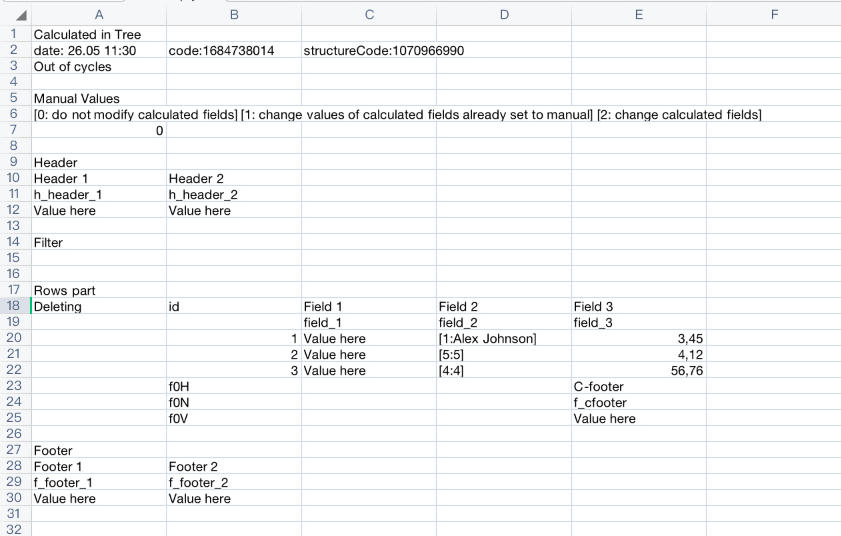
The file format is read line by line, all sections are needed during the upload.
1st line — table header.
2nd line:
Date-time of the export.
Updated code of the exported table at the time of export — it determines whether the table has been changed after the export during the upload. If it does not match, a warning will be displayed.
Updated code of the Field Composition table — it determines whether the Field Composition table has been changed after the export during the upload. Changes in the Field Composition may not affect the current table. If it does not match, a warning will be displayed.
3rd line — cycle information for calculation tables in the cycle.
4th line — empty, separator.
5th line — header
"Manual values".6th line — informational about possible values of the
"Manual values"parameter.7th line — values of the
"Manual values"parameter — for upload.0 — “do not process calculated fields”, means that the values of all fields with an active Code section will not be updated during the upload.
1 — “change values of calculated fields already set to manual”, means that the values of fields with an active Code section will be updated only if the field has a manual value set.
2 — “change calculated fields”, means that the values of fields with an active Code section will be changed and set to manual if they differ from the calculated ones during the upload.
8th line — empty, separator.
9th line — header
"Header".10th line — header field names.
11th line —
nameof the header fields.12th line — values of the header fields.
13th line — empty, separator.
14th line — header
"Filter".15th line — empty or encrypted filter value.
16th line — empty, separator.
17th line — header
"Row part".18th line — column headers.
19th line —
nameof the columns.20th - n lines — rows.
In calculation tables
If there are column footers, they are displayed after the rows in the corresponding columns as follows:
;f0H;;"Column footer header"
;f0N;;name_fc_1
;f0V;;"Value fc1"
;f1H;;"Column footer header 2"
;f1N;;name_fc_1
;f1V;;"Value fc1"
After the row part:
s + 1 — header
"Footer".s + 2 — footer column names.
s + 3 —
nameof the footer columns.s + 4 — values of the footer columns.
Example of CSV export (line numbers are shown for informational purposes, they are absent in the actual export):
1.  "New table"
2.  "from 23.10 19:46";code:1013933786;structureCode:1838388430
3.  "Out of cycles"
4.  ;;
5.  "Manual values"
6.  "[0: do not process calculated fields] [1: change values of calculated fields already set to manual] [2: change calculated fields]"
7.  0
8.  ;;
9.  Header
10. "Header field 1";"Header field 2"
11. name_h_1; name_h_2
12. "Value h1";"Value h2"
13. ;;
14. Filter
15. "gfhutyfndhjfoi98863chyhvx...."
16. ;;
17. "Row part"
18. Deletion;id;"Column 1";"Column 2"
19  ;;name_1;name_2
20. ;1;"Value 1 row 1";"Value 2 row 1"
21. ;2;"Value 1 row 2";"Value 2 row 2"
22. ;3;"Value 1 row 3";"Value 2 row 3"
23. ;f0H;;"Column footer 1"
24  ;f0N;;name_fc_1
25. ;f0V;;"Value fc1"
26. ;;
27. Footer
28. "Footer field 1";"Footer field 2"
29  name_h_1; name_h_2
30. "Value f1";"Value f2"
31. ;;
Field Features in CSV
Fields Button and Comments are exported empty and are not subject to import.
Field Password is exported empty, imported as a string.
Fields Text, Data are exported and imported in base64 format.
Field File cannot be exported and must be hidden.
Fields Select and Select-tree are exported in the form [base:value].
For multiple selects in the form [base1:value1][base2:value2].
They are imported in the same way. The base is significant during import, the value can be empty — [3:].
Rows CSV
Export of the Row Part
When exporting Only the Row Part, only the visible fields and rows of the row part are exported in the order of fields as seen by the user.
Without id of rows and headers. Only data.
Import of Row Part
When uploading, only new rows are added. Updating data in rows in this mode is not possible.
Column mapping in the uploaded file occurs 1 to 1 in the order in which the user sees the fields at the time of upload.